Sunday, June 5, 2011

SLOW BRAISED WHOLE PORK BELLY IN CROCKPOT


I was in an Asian Market and saw this beautiful pork belly with the 5 layers of fats and meats(五花腩) . I brought it home and decided to make my Mom's recipe Braised pork Belly.

Firstly marinate the pork belly and then pan-fried the four corners of the meat. Then put it in a slow cooker to cook.


This is the whole pork belly that being pan-fried on four corners. I know....my pork belly looks too dark and that's because I have over pour my dark soy sauce =P

After the braising at the slow cooker in high for 6 hours, slowly lift up the pork belly and let it cool completely before cutting into pieces to assemble. Look at the texture of meat....it's so juicy and delicious.


Assemble the pork belly accordingly on the platter and pour some braised sauce on top.

Served hot with steamed white rice.

Wednesday, June 1, 2011

LEMON ORANGE CHEESE CHIFFON CAKE


I have some leftover cream cheese, lemons and oranges in my fridge and decided to make a chiffon cake for breakfast tomorrow morning.

The chiffon turns out to be soft and fluffy with the tangy taste of the lemon and orange. It sure good with tea or coffee......yummy!!!!


INGREDIENTS :

(A)
1/2 cup freshly squeezed lemon and orange juice
4 oz cream cheese ( I used fat free cream cheese )
3 tbsp unsalted butter

(B)
6 large egg yolks
1 cup cake flour
1/2 tsp baking powder
1/2 tsp fine salt
1 orange, zested
1 lemon, zested

(C)
6 large egg whites
1 cup fine granulated sugar
1/2 tsp cream of tartar


METHODS :

1. Combine ingredients (A) in a double-boiler and cook stirring occasionally until thicken. Set aside to cool completely.

2. Preheat oven to 325 degree F.

3. Sieved the cake flour, baking powder and salt in a mixing bowl and stir well. Then in a food processor, add in the cooled cheese mixture, egg yolks and flour mixture. Blend it until the mixture is smooth. Pour into a mixing bowl and set aside.

4. In another mixing bowl with a whisk attachment, in high speed whisked the egg whites until foamy. Then add in the sugar and cream of tartar in high speed until stiff peak.

5. Fold the egg white mixture to the cake batter in 3 additions. Pour the cake batter into an ungreased tube pan and bake for 55 to 60 minutes.

6. Invert the tube pan immediately on a wire rack to cool completely. Using a sharp knife, carefully go around and under the cake for easy removing the tube pan. Cut the cake into desired sizes and served.


Wednesday, May 4, 2011

ORANGE CRANBERRY CAKE TOPPED WITH SLICED ALMONDS


After a month not posting any recipes, I think all my friends must be curious what am I doing. Anyway...I'm back with lots of recipes to share within this month of May. I've been experiencing and searching for new recipes to share with my loyal followers.

So today I would like to share this recipe with all of you which is very yummy and tasty. This is Orange Cranberry Cake topped with Sliced Almonds. Isn't it sound interesting......tell you what.....it even taste delicious with the hint of orange zest, orange juice, cranberries and the crunchiest of the almonds.


To further no more.....hereby is the recipe and happy baking =)


INGREDIENTS :

185g unsalted butter
1/4 tsp fine salt
150g fine granulated sugar
3 large eggs
2 tsp grated orange zest
190g unbleached cake flour
4 tbsp freshly squeeze orange juice
1/4 cup dried cranberries, tossed with some cake flour
1/4 cup sliced almonds


METHODS :

1. Preheat oven to 350 degree F. Grease the cake pan with some non-stick cooking spray and some flour.

2. Sieve the cake flour, baking powder and salt. Set aside. Using an electric stand mixer, beat butter and sugar until very pale and creamy for about 20 minutes.

3. Add the eggs one at a time, beating for a few minutes after each addition. Do not rush the addition of the eggs as mixture will be more likely to separate and develop a curdled appearance. Add the orange zest with the last egg. The batter mixture should be pale and creamy.


4. Add half the flour mixture and blend it until just combined. Repeat with the remaining flour mixture. Mix in the orange juice and dried cranberries .

5. Spoon the cake batter into prepared cake pan and spread evenly. Topped the batter with sliced almonds.

6. Bake for about 50-55 minutes, or until a thin-bladed knife or wooden skewer inserted into the center of the cake comes out clean. The cake should spring back when lightly pressed in the center.

7. Slowly remove the cake from the cake pan and let it cool on a wire rack.


This cake is so delicious and moist. It's best served with some coffee or tea.....ENJOY!!!!!

Monday, March 28, 2011

LEMON GLAZED CHICKEN WINGS


This Lemon Glazed Chicken Wings is really the best recipe I ever created. These wings have the taste of sweet and tangy and my kids are the big fans. Hereby....let me share this special recipe with all of you =)


INGREDIENTS :

2 lb whole chicken wings, cleaned and cut in 2 pieces with the tips removed
2 tsp freshly grated ginger
6 slices of fresh lemon, or more for ganishing

For Marinate Seasoning :
2 tbsp light soy sauce
1 tsp kosher salt
2 tsp cornstarch
4 tsp Shaoxing cooking wine
Some freshly ground black pepper


For Seasoning Sauce :
3 tbsp honey
2 tbsp sugar
2 tbsp fresh lemon juice
4 tbsp water
2 tsp cornstarch


METHODS :

1. In a bowl, mix all the marinade seasoning and add the cleaned and patted dry chicken wings. Covered the bowl with plastic wrap and refrigerator for at least 2 hours.

2. Heat the saute pan with some vegetable oil over medium heat. Pan fried the chicken wings both sides until golden brown. Stir in the grated ginger, covered and cook for at least 5 minutes or until the chicken wings are throughly cooked.

3. Open the cover and poured in the seasoning sauce with the lemon slices and stir until well combined. Cook the sauce until thickened and dish up on a platter.

Serve hot with some steamed white rice

Friday, March 25, 2011

PINEAPPLE UPSIDE-DOWN CAKE


An upside-down cake is a cake usually made in a pan with a curved bottom. Once cooked, turned over and allowed to set, the cake eaten upside-down. Usually, chopped fruits such as apples, pineapples and cherries are placed at the bottom of the pan before the batter is poured in, so that they form a decorative topping once the cake is inverted.

I adapted this recipe from Emeril Lagasse at Food Network. After trying with so many recipes, I love Emeril recipe the most. His cake comes out so fluffy and the taste was delicous :P


INGREDIENTS :

1/2 ripe medium pineapple, peeled, cored, eyes removed and sliced into 1/2-inch rounds
( about 4 or 5 slices )
3/4 cup ( 1 1/2 sticks ) unsalted butter
3/4 cup light brown sugar
14 pecan halves
1 cup cake flour ( not self-rising)
1 cup all-purpose flour
1 tsp baking powder
1 tsp baking soda
1/4 tsp salt
1 cup granulated sugar ( I only used 1/2 cup if you like it less sweet )
2 eggs
1 cup buttermilk
1 1/2 tsp pure vanilla extract
1 tbsp dark rum
4 fresh, halved and pits removed ( I used can cherries with juices )


METHODS :

1. Melt 4 tbsp of the butter in a 10-inch cast iron skillet, over medium heat. Add the brown sugar and stir to combine. Increased the heat to medium high and cook until the sugar mixture is bubbly, about 2 minutes. Arrange pineapple slices in the skillet in a pleasing pattern and continue to cook for 2 minutes, or until the sugar mixture turns an amber color. Turn the pineapple slices over and remove the pan from the heat. The mixture will continue to cook even though the heat is off. Arrange the pecan halves in the spaces between the rings. Set aside to cool slightly.

2. Preheat the oven to 375 F.

3. Stir together the flours, baking powder, baking soda and salt in a medium mixing bowl.

4. In the bowl of an electric mixer, cream together the remaining 1/2 cup butter and granulated sugar until light and fluffy. Add the eggs, 1 at a time, mixing just until incorporated. Add the flour mixture and buttermilk alternately in 3 batches, mixing at low speed after each addition until just combined. Stir in the vanilla and rum.

5. Spoon the batter evenly over the pineapple slices in the skillet. Bake in the middle of the oven until golden brown and a tester comes out clean, about 35 to 45 minutes.

6. Cool the cake in the skillet on a wire rack for 4 minutes only. Run a thin knife around the edge of the cake and, wearing oven mitts and working quickly, invert the cake onto a cake place, keeping plate and skillet firmly pressed together. Carefully lift the skillet off the cake and replace any fruit stuck to the bottom of the skillet, if necessary. Arrange the fresh cherry halves, cut side down, into the top of the cake, in the center of the pineapple rings.

Serve cake warm or at room temperature

Thursday, March 24, 2011

HAINANESE CHICKEN RICE / 海南雞飯


Although Hainanese Chicken Rice is a mainstay in food food courts and restaurants in Singapore and Malaysia, its origins lie with the Chinese living on the island of Hainan off the coast of China.

I would like to share this recipe which I found from my favorite blogger friends, Jaden at Steamy Kitchen. After attempting with so many recipes, I found this is the best I ever found. The Hainanese Chicken tastes so good and delicious with the combinations of the Ginger Scallion Sauce, Garlic Chili Sauce and some ABC brand sweet dark soy sauce. Hereby I would like to share this recipe with friends.


INGREDIENTS :

FOR POACHING THE CHICKEN
1 whole chicken ( about 3.5 to 4 lbs ), preferably Organic
Kosher salt
4" section of fresh ginger, sliced in 1/4" thickness
2 stalks green onions, cut into 1" sections ( both the green and white parts )
1 tsp sesame oil

FOR THE RICE:
2 tbsp chicken fat or 2 tbsp vegetable oil
3 cloves garlic, finely minced
1" section of ginger, finely minced
2 cups long-grain uncooked rice, washed and soaked in cool water for 10 min or longer
( I soaked for 2 hours )
2 cups reserved chicken poaching broth
1" fresh ginger
a generous pinch of salt, to taste

FOR THE GARLIC CHILI SAUCE
1 tbsp lime juice
2 tbsp reserved chicken poaching broth
2 tsp sugar
4 tbsp Sriracha chili sauce
4 cloves garlic
1" fresh ginger
a generous pinch of salt, to taste

FOR THE GINGER SCALLION SAUCE
(recipe courtesy of My Kitchen Snippets)
1/4 cup finely grated ginger
1/2 cup finely chopped green onion
1 clove garlic, finely chopped
3 tbsp sesame oil
1/2 cup vegetable oil
salt and pepper to taste
FOR THE TABLE
1/4 cup dark soy sauce ( I used ABC brand sweet dark soy sauce )
Few sprigs cilantro leaves
1 cucumber, thinly sliced or cut into bite-sized chunks


METHODS:

1. To clean the chicken, with a small handful of kosher salt, rub the chicken all over, getting rid of any loose skin and dirt. Wash and pat the chicken very dry inside and outside. Season the chicken generously with some salt inside and outside. Stuff the chicken with the ginger slices and green onion. Place the chicken in a large stockpot and fill with cold water to cover the chicken by 1-inch. Bring the pot to a boil over high heat, then immediately turn the heat to low to keep a simmer. Cook about 30 minutes more ( less if you're using smaller chicken ). Check for doneness by sticking a chopstick into the flesh under the leg and see if the juices run clear or insert a thermometer into the thickness part of the tight not touching the bone and it should be read 170F.

2. When the chicken is cooked through, turn off the heat and remove the pot from the burner. Immediately lift and transfer the chicken into a bath of ice water to cool and discard the ginger and green onions. Don't forget to reserve the poaching broth for your rice, chili garlic sauce and accompanying soup. The quick cooling will stop the cooking process, keeping the meat soft and tender, and giving the skin a lovely firm texture.

3. To cook the rice: Drain the rice. In a wok or saucepan ( use a medium saucepan if you plan on cooking the rice on the stove top ), heat 2 tbsp of cooking oil over medium-high heat. When hot, add the ginger and the garlic and fry until your kitchen smells like heaven. But be careful not to burn the aromatic!!! Add in your drained rice and stir to coat, cook for 2 minutes. Add the sesame oil, mix well.

To cook rice on the stove: In the same saucepan, add 2 cups of your reserved poaching broth, add salt and bring to a boil. Immediately turn the heat down to low, cover the pot and cook for 15 minutes. Removed from heat and let it sit with the lid on for about 5-10 minutes or more.

To cook rice in rice cooker: Pour aromatics and rice ( after frying ) into your rice cooker, add 2 1/2 cups of your reserved poaching broth and salt. And turn on the rice cooker switch.

4. While your rice is cooking, removed the chicken from the ice bath and rub the outside of the chicken with the sesame oil. Carved the chicken into serving size to served.

5. To make the garlic chili sauce: Blend your garlic chili sauce ingredients in a blender until smooth and bright red.

6. To make the soup: You should have 6 to 7 cups of reserved poaching broth leftover to serve as soup. Just before serving, heat up the soup, taste and season with salt as necessary.

7. To make the ginger scallion sauce: Put the ginger, green onion and garlic in a bowl. Add in sesame oil, salt and pepper. Stir well and set aside. In a small saucepan, heat up the oil until smoking hot. Pour the hot oil carefully and slowly into the ginger mixture. Using a chopstick and mix it well.
NOTE: Please be careful when you pour the oil into the ginger mixture as the oil will splatter and bubble over the herbs.


Serve the chicken rice with garlic chili sauce, dark soy sauce, cucumber slices, and a bowl of hot broth garnished with cilantro leaves or green onions.


Wednesday, March 23, 2011

STEAMED HAKKA HEE PAN / XIN BAN ( 喜板 )


Hakka Hee Pan is a traditional Hakka people kuih which right now being enjoyed by many people in a region. This kuih usually served in Hakka wedding and Chinese traditional ceremonies.

That's the look of the Hakka Hee Pan being mould and waiting for it to proof for another 20 minutes at a warm place.


Hereby is the recipe I would like to share and it can makes about 15 pieces of Hakka Hee Pan.


INGREDIENTS:

(A)
1 tsp instant yeast
150 g all-purpose flour
125 ml water

(B)
150 g all-purpose flour
150 g glutinous rice flour

(C)
150 g fine granulated sugar
150 g water
2 pandan leaves, knotted
a few drop of pink coloring


Some banana leaves - greased with some oil


DIRECTIONS :

1. Mix all the ingredients (A) for the sponge dough, covered it with plastic wrap and keep it overnight at a warm place so it can proof/rise the next day.

2. The next day, bring the ingredients (B) to a boil. Removed the pandan leaves and set it aside to cool.

3. Mix all the ingredients (A), (B) and (C) together into soft dough by kneading it for 20 minutes. Cover the dough and let it proof/rise for another 4 hours in a warm place.

4. Put enough water in the steamer and bring to a boil. Apply enough oil on your fingers and palms, slowly pull out enough dough (about 50g each) to form a small ball and gently drop them onto greased banana leaves. Let it proof/rise again for another 15 minutes at a warm place.

5. Steamed the hee pan in a moderate heat for at least 15 minutes.

6. Trim the excess banana leaves around the random shape of these steamed buns with a scissor.


This Hakka Hee Pan is good when eat it freshly right after steaming or in the same day. Enjoy!!!


Wednesday, March 9, 2011

HONG KONG STYLE EGG TART ( 蛋撻 )

The egg tart or egg custard tart ( commonly romanized as dan ta / 蛋撻 ) is a pastry commonly found in Hong Kong and other Asian countries, which consists of an outer pastry crust that is filled with egg custard and baked. Fluted French Tart Quiche Pan, Set of 6
I got these 12 mini tart pan from a friend name Julie Tan and her company, Brown Cookie been selling all kind of baking utensils. I loved these mini tart pan because they baked very evenly and very easy to released. If you want to bake these tarts and need those mini tart pans....I highly recommend that you can get from Brown Cookie.


Today, egg tarts come in many variations within Hong Kong cuisine, including egg white, milk , honey-egg, ginger-flavored egg, which are variations of a traditional milk custard and egg custard served in cha chaan tengs, and also chocolate tarts, green-tea-flavoured tarts, and even bird nest tarts.

Overall, Hong Kong egg tarts have two main types of crusts: shortcrust pastry and puff pastry pastry, traditionally made with lard rather than butter or shortening. Most Hong Kong Chinese food purists hold the egg tarts made with puff pastry in higher regard.

My recipe will make about 24 egg tarts


INGREDIENTS :

For the Crust:

450 g All Purpose flour
250 g unsalted butter, at room temperature
110 g powdered sugar
2 eggs, whisked
1 tsp pure vanilla extract
1 tsp salt


METHODS :

1. Cream the butter and sugar with an electric mixer over medium speed until the mixture is smooth, fluffy and light in color.

2. Add in the whisked egg, half at a time and beat over low speed. Then add in the vanilla extract.

3. Sieve the flour and mixed it with the salt. Then add the flour into the egg mixture in 3 batches. scraping down the sides of the bowl between additions with a spatula until well combined.

4. Knead the dough and make it into a rectangle shape, wrapped it with a plastic wrap and refrigerate for 1 hour.

5. Preheat the oven to 400 degree F. Take the dough from the refrigerator and roll out the dough to 1/4-inch thickness and use the top part ( measured 3-inches ) of the tart pan to cut the shape. Then press firmly into the tart pan to cover evenly. Continue with the rest of the tart pans and put them on a baking sheet. Set aside.


For the Custard Filling:

210 g granulated sugar
480 g water
6 eggs plus 3 egg yolks
90 ml evaporated milk
1 1/2 tbsp custard powder
1 1/2 tsp pure vanilla extract


METHODS :

1. Add the sugar and water into a saucepan and cook until melted. Set aside to slightly warm.

2. In a bowl, slowly add the evaporated milk into the custard powder and whisked until well combined. Then whisked in the eggs.

3. Pour in the sugar syrup into the egg mixture and whisked until well combined. Strained the egg mixture and then add the vanilla extract.

4. Slowly pour the egg mixture into each prepared tart pans and bake for at least 20-25 minutes.

5. While baking about 10-15 minutes, check the oven for the custard been puffed. Once you see the custard been puffed a little, open the oven door slightly about 2-3 inches. Continue baking until the time is end.

6. After baking, let the tarts sit on the baking sheet for 5 minutes. Remove the egg tart slowly from the tart pan and served.

Tuesday, March 8, 2011

ROASTED CHICKEN WITH BALSAMIC VINAIGRETTE


This is one of my favorite recipe from Giada De Laurentiis at Food Network. This is an Italian cuisine and it's so delicious to serve it to your family and friends.


INGREDIENTS :

1 (4 lb) whole chicken, cut into pieces
1/4 cup balsamic vinegar
2 tbsp Dijon mustard
2 tbsp fresh lemon juice
2 cloves garlic, chopped
2 tbsp olive oil
1/2 cup low-salt chicken broth
1 tsp lemon zest
1 tbsp chopped fresh parsley leaves
Salt and freshly ground black pepper


METHODS :

1. Whisk the vinegar, mustard, lemon juice, garlic, olive oil, salt and pepper in a small bowl to blend. Combine the vinaigrette and chicken pieces in a large resealable plastic bag and toss to coat. Refrigerate, turning the chicken pieces occasionally, for at least 2 hours and up to 1 day.

2. Preheat the oven to 400 degree F. Remove the chicken pieces from the bag and arrange it on a large greased baking dish. Roast until the chicken is just cooked through, about 1 hour. If your chicken browns too quickly, cover it with foil for the remaining cooking time.

3. Transfer the chicken pieces to a serving platter. Place the baking dish on a burner over medium-low heat. Whisk the chicken broth into the pan drippings. Drizzle the pan drippings over the chicken.

4. Sprinkle the lemon zest and parsley over the chicken, and serve.

Monday, March 7, 2011

NYONYA KUIH LAPIS / NINE LAYERS CAKE ( 九層糕 )


Yesterday I was so bored and came out with this new recipe of mine.....Nyonya Kuih Lapis. Traditionally this kuih is made in nine-layers - hence the name - by alternating red, green and white layers.


INGREDIENTS :

200 g rice flour
100 g tapioca flour
100 g green bean flour
800 ml coconut cream
250 g fine granulated sugar
1 tsp salt
1 tsp pandan paste
some red coloring
some water


METHODS :

1. In a saucepan heat the coconut cream, salt and sugar and let it slightly cool.

2. Meanwhile in a mixing bowl, mixed the rice flour, tapioca flour and green bean flour. Then add the coconut mixture, mix it well and sieve. Put this mixture on a scale then slowly add enough water to make it up to 1800g in total of weight and mix it well.

3. Divide the mixture into 3 equal portions, each weighing about 600g. Add one portion with pandan paste and the other one with red coloring.

4. In a steamer in medium heat, heat the 8" square glass pan for about 5 minutes. Then wipe the glass pan with a paper towel to avoid any water in it.

5. Pour the white portion weight at 200g and steam for at least 5-6 minutes or till the layer is set. Then pour the in the second green layer in the same amount of weight as the white layer, steam it and pour the red color. Continue this method until the nine-layers form.

6. When comes to the last layer (red color), steam the kuih for at least 15-20 minutes to ensure the whole kuih is perfectly cooked through.

7. Cool completely before cutting into your favorite shape. The best way to cut is to use a plastic serrated knife.

Sunday, March 6, 2011

SEASONED MEAT ROLLS (HOKKIEN LOH BAK)


This is one of my mom's recipe which she used to make it on any Chinese festival moment. I love this dish so much especially when you dipped it with some chili sauce.

To make this dish, you need some beancurd sheets which you can find it at the frozen aisle in Asian groceries store. Alright....here I wanna share my recipe with you'll ;


Seasoned the ground meat ( about 1 1/2 pound ) with 3 tsp sugar, 1 tsp chicken stock granules, 2 tbsp oyster sauce, 1 tbsp hoisin sauce, 2 tsp five spice powder, 2 tbsp cooking wine, 2 tbsp tapioca flour, salt & pepper and some sesame oil. Then add in 1 chopped medium onion, 1 shredded whole carrot, 6 cloves chopped garlic and 2 beaten eggs. Mix it well.


Cut the beancurd sheet into 4 pieces. Spoon about 4 to 5 tbsp of meat mixture onto the beancurd sheet and roll up tightly. Continue with the rest until the meat mixture is all used up.


In the steamer with a high heat, steamed the beancurd rolls for at 8 minutes and let it cool on wire rack before cutting into pieces.


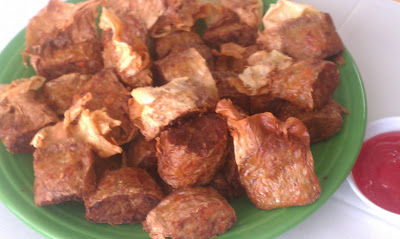
Then cut the steamed cooled beancurd rolls into small pieces. In a pot filled it with oil and turn the heat to medium high. Dipped the two cut end with flour and deep-fry until golden brown.


Served it your favorite chili sauce.


Wednesday, March 2, 2011

SPRING COLOR CHIFFON CAKE


Last week while I was browsing the my favorite blogger pages, I came to this Rainbow Chiffon Cake which posted by My Kitchen Snippets.

Although is kind of lot of work but but the outcomes really pretty with all the Spring Color and it's tastes yummy too with all the different flavoring. It even taste better with a cup of tea, coffee or milk.


Here is the recipe I would like to share with you'll;


INGREDIENTS :

(A)
8 egg yolks
50 g fine granulated sugar
20 g milk powder
20 g cornstarch/cornflour
150 g cake flour
1 tsp baking powder
1/2 tsp salt
100 ml vegetable oil
100 ml coconut milk

(B)
8 egg whites
120 g fine granulated sugar
1 tsp cream of tartar

(C)
A few drop of Pandan paste
A few drop of Pink coloring
A few drop of Strawberry flavoring
A few drop of Yellow coloring
A few drop of Lemon flavoring
2 oz of melted Chocolate


DIRECTIONS :

1. Preheat the oven to 350 degree F.

2. Sieve cake flour, cornstarch, milk powder, salt and baking powder. Mix it well and set it aside. In another bowl, combine the coconut milk and vegetable oil together.

3. In a mixing bowl, mix the egg yolks and 50g of sugar until pale and well combined. Add the coconut milk and oil mixture. Mix it well. Lastly add in the flour mixture and mix it until the mixture is smooth and well combined.

4. Divide the cake mixture into 4 equal portions. Mix one portion with pandan paste, one with strawberry flavoring and pink color, another one with the melted chocolate and the last one with lemon flavoring and some yellow coloring. Mix all the cake mixture portions well and set it aside.

5. In a mixer, whisk all the Ingredients (B) on a high speed until soft peak. Divide the meringue into 4 equal portions and fold it into the individual color cake mixture. Pour each of the colored cake batter into an ungreased tube pan accordingly. Bake it for 50 minutes or until golden brown and tested skewer comes out clean.

6. Take out the cake from the oven and invert it immediately. Leave it to cool completely before removing the cake from the tube pan. Run a long sharp knife to the side and bottom of the tube pan to remove the cake. Cut the cake and serve.


Tuesday, February 22, 2011

LEMON-BUTTER GREEN BEANS WITH PINE NUTS


I love green beans and their crisp when they are really fresh. I have adapted this recipe from Emeril Lagasse at Food Network. This recipe comes out to be so yummy and lemony with the touch of the nuttiest of the pine nuts. This is a recipe worth to try =)


SERVES : 2 servings

INGREDIENTS :

1/3 pound fresh green beans, ends trimmed, blanched in boiling salted water
1 tbsp unsalted butter
1 tbsp minced shallots
1 tbsp pine nuts
1 tsp fresh lemon juice
Pinch of salt
Pinch of freshly ground black pepper


METHODS :

1. Drain green beans well and pat it dry.

2. Heat the butter in a medium skillet over medium heat. Add shallots and cook for 1 minute, stirring constantly to keep from burning. Add the pine nuts and cook, stirring, for an additional minute. Add the green beans and toss to coat evenly. Cook just enough to warm through, about 1 minute.

3. Add the lemon juice, salt and pepper and toss to combine.

4. Remove from the heat and serve immediately.

Sunday, February 20, 2011

FRIED CHEESE RAVIOLI


Usually fresh ravioli is served with marinara sauce after cooked in a boiling water. This time I'm making them in crispy texture and sprinkle with some fresh grated Parmesan and good quality of marinara sauce.

The result to the outcomes was delicious and it's the best appetizer. Hereby is the recipe I would like to share;


INGREDIENTS :

Olive oil, for frying
1 cup buttermilk
2 cups Italian-style bread crumbs
1 box store-brought cheese ravioli
1/4 cup freshly grated Parmesan
1 jar store brought marinara sauce, heated, for dipping


METHODS :

1. Pour enough olive oil into a large frying pan to reach a depth of 2 inches. Heat the oil over medium heat until a deep-fry thermometer register 325 degree F.

2. While the oil is heating, put the buttermilk and the bread crumbs in separate shallow bowls. Working in batches, dip ravioli in buttermilk to coat completely. Allow the excess buttermilk to drip back into the bowl. Dredge ravioli in the bread crumbs. Place the ravioli on a baking sheet and continue with the remaining ravioli.

3. When the oil is hot, fry the ravioli in batches, turning occasionally, until golden brown, about 3 minutes. Using a slotted spoon, transfer the fried ravioli to paper towels to drain.

4. Sprinkle the fried ravioli with freshly grated Parmesan and serve with a bowl of warmed marinara sauce for dipping.